I’m sure there’s confusing and intentionally misleading information about playing the stock market or home dentistry here on the Internet, but I have a hard time believing any information out there is as screwed up as what I see about shock rates on mountain bikes. What we hear from a lot of manufacturers comes to us as filtered through the Marketing department, and for all we know originated as much in Accounting as in Engineering (“Say, we got a great deal on a thousand rockers so-and-so couldn’t use. How ’bout you design a frame that uses them?”), so bullshit is rampant. Often, getting information about how suspension systems actually work in this business is like listening to a drunk friend describe a movie you’ve never seen.
I’m certainly no engineering expert myself, though as English Majors go, I think I’m passable, and I do have that level of respect for simple machines that gets earned somewhere in the four thousandth hour of staring at a design and trying to figure out why it keeps laughing and kicking you in the nuts instead of “working.” The key to making something decent is knowing what you want, and what I want out of my design is the Holy Grail of shock rates: the highly variable one.
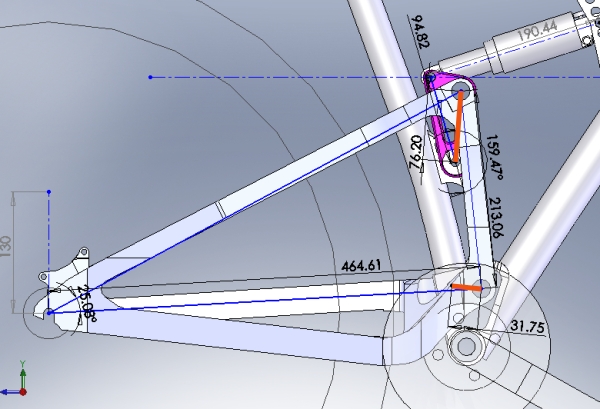
In an earlier post, I’d mentioned the advantages of using short rockers to give yourself maximum shock rate tuning options. My thinking there–and it could be flawed, but I don’t think so–is that shorter rockers have the ability to rotate more throughout the movement of a suspension system (as opposed to something like a Horst-link bike, in which the whole chainstay is effectively a slower rotating link), and that two substantially rotating little rockers open a lot of tuning doors.
Why? In the illustration below, I’ve colored my rockers orange.
Consider the rotation of each of the orange rockers in the image above. Now imagine each of those orange lines connected to the main frame and spinning in a circle, what you effectively have are two gears. Their movement can be very finely tuned, and that means so can your shock rate.
So now’s the time in the course of development when I throw out all previous shock rates I’d created and look to come up with one, final, “perfect” set of shock and leverage rates I can graph like these examples. Ideally, you want your suspension to be as supple as possible up to the sag point–the point to which the suspension should compress with a rider on the bike–then firm up at and just past that point for pedaling, then drop away some for smooth bump absorption during that middle range of travel, before finally firming up again as the frame begins to run out of travel.
That might seem like total gobbledygook to some of you, but hardcore nerds out there, I welcome your feedback: please send your thoughts as to the ultimate shock rates throughout a bicycle’s rear wheel travel. I’ll keep tuning that shock position and those rates in the meantime, and will try to go into greater detail right here. There’s still a particular type of ride that I’ve just never gotten from any other frame, and that’s what I’m after.
That, and a name for this thing. Suggestions welcome there, too.


Sorry, the comment form is closed at this time.